Kia Soul EV: Fuses And Relays / Relay Box (Engine Compartment) Repair procedures
Kia Soul EV (PS EV) 2015-2020 Service Manual / Body Electrical System / Fuses And Relays / Relay Box (Engine Compartment) Repair procedures
| Inspection |
| 1. |
Disconnect the negative (-) battery terminal. |
| 2. |
Pull out the relay from the engine compartment relay box. |
Power Relay (Type A)
|
Check for continuity between the terminals.
A : Power outlet relay
B : Cooling fan relay 1
C : Defroster relay
| 1. |
There should be continuity between terminals No.30 and No.87 when power and ground are connected to terminals No.85 and No.86. |
| 2. |
There should be no continuity between terminals No.30 and No.87 when power is disconnected.
|
Power Relay (Type C)
Check for continuity between the terminals.
A : Cooling fan relay 2
| 1. |
There should be continuity between terminals No.30 and No.87 when power and ground are connected to terminals No.85 and No.86. |
| 2. |
There should be no continuity between terminals No.30 and No.87 when power is disconnected.
|
Replacement of EMS box
| 1. |
Disconnect the negative (-) battery terminal. |
| 2. |
Loosen the mounting nuts (A) and bolt (B).
|
| 3. |
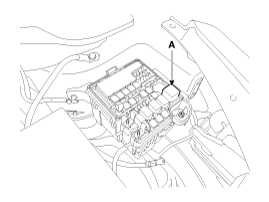
Remove the engine room fuse & relay box from the hole (A).
|
| 4. |
Separate the engine room upper box (A) and lower cover (B).
|
| 5. |
Remove the wire cover (A) on the engine room lower box.
|
| 6. |
Disconnect the connectors (A) from the EMS box.
|
Fuse
| 1. |
Be sure that there are no loose fuse holders and that the fuses are held securely. |
| 2. |
Is the fuse capacity correct for each circuit? |
| 3. |
Are there any blown fuses?
If a fuse is to be replaced, be sure to use a new fuse of the
same capacity. At all times, determine the cause of blown fuse and
eliminate the problem before installing a new fuse. |
Multi Fuse

|
 Relay Box (Engine Compartment) Components and Components Location
Component Location
...
 Relay Box (Passenger Compartment) Components and Components Location
Component Location
...
Other information:
Kia Soul EV (PS EV) 2015-2020 Service Manual: Rear Hub - Carrier Components and Components Location
Components 1. Rear dust cover2. Rear wheel hub assembly3. Rear brake disc ...
Kia Soul EV (PS EV) 2015-2020 Service Manual: Power Window Motor Repair procedures
Inspection Front Power Window Motor 1. Disconnect the negative (-) battery terminal. 2. Remove the front door trim. (Refer to Body - "Front Door Trim") 3. Disconnect the connector (A) from the motor. (A : Safety, B : Standard) 4. Connect the motor terminals directly to battery vol ...
Copyright © www.ksoulev.com 2020-2025


