Kia Soul EV: Heat Pump / Inner Condenser Repair procedures
Kia Soul EV (PS EV) 2015-2020 Service Manual / Heating,Ventilation, Air Conditioning / Heat Pump / Inner Condenser Repair procedures
| Replacement |
|
|
|
| 1. |
Recover the refrigerant with a recovery/ recycling/ charging station.
|
| 2. |
Disconnect the negative (-) battery terminal. |
| 3. |
Shut off the high voltage circuit. (Refer to EV Battery System - "High Voltage Shut-off Procedure") |
| 4. |
Remove the cowl top cover.
(Refer to Body -"Cowl Top Cover") |
| 5. |
Remove the pipe (A) after loosening the mounting bolts.
|
| 6. |
Remove the expansion valve (A) after loosening the mounting bolts from the evaporator core.
|
| 7. |
Loosen the cowl cross member mounting bolts (A).
|
| 8. |
Remove both sides of front seat assembly.
(Refer to Body - "Front Seat Assembly") |
| 9. |
Remove the floor console assembly.
(Refer to Body - "Floor Console Assembly") |
| 10. |
Remove the crash pad lower panel.
(Refer to Body - "Crash Pad Lower Panel") |
| 11. |
Remove the glove box housing.
(Refer to Body - "Glove Box Housing") |
| 12. |
Remove the crash pad center panel.
(Refer to Body - "Crash Pad Center Panel") |
| 13. |
Remove both sides of the front pillar trim.
(Refer to Body - "Front Pillar Trim") |
| 14. |
Remove both sides of the cowl side trim.
(Refer to Body - "Cowl Side Trim") |
| 15. |
Remove the steering column shroud lower panel.
(Refer to Body - "Steering Column Shroud Panel") |
| 16. |
Remove the steering wheel.
(Refer to Steering System - "Steering Wheel") |
| 17. |
Remove the multifunction switch.
(Refer to Body Electrical System - "Multifunction Switch") |
| 18. |
Lower the steering column after loosening the mounting bolts.
(Refer to Steering System - "Steering Column and Shaft") |
| 19. |
Remove the rear airduct assembly (A).
[LH]
[RH]
|
| 20. |
Remove the shift lever assembly.
(Refer to Automatic Transaxle System - "Shift Lever") |
| 21. |
Disconnect the airbag control module (SRSCM) connector (A).
|
| 22. |
After loosening the mounting bolts and nuts, remove the cowl cross bar center bracket (A).
|
| 23. |
Disconnect the passenger compartment junction box connectors (A).
|
| 24. |
Remove the passenger compartment junction box mounting clips (A).
|
| 25. |
Disconnect the multi box connectors (A).
[Driver''s]
[Passenger''s]
|
| 26. |
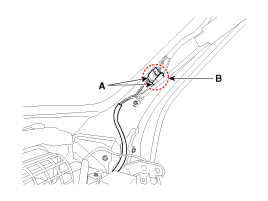
Disconnect the connector (A) and the mounting clips (B) in the front pillar.
[Driver''s]
[Passenger''s]
|
| 27. |
Remove the drain hose (A).
|
| 28. |
Disconnect the high voltage PTC heater cable (A).
|
| 29. |
After loosening the bolts, remove the main crash pad and cowl cross bar assembly (A) altogether.
|
| 30. |
Remove the interior condensor cover (A) after loosening the mounting screws.
|
| 31. |
Remove the interior condenser (A) in the direction of the
arrow.Since the electric compressor uses high-voltage, POE oil with high
resistivity should be used.
|
| 32. |
Install in the reverse order of removal.
|
 Inner Condenser Description and Operation
Description
Uses high temp-high pressure refrigerant to warm the air
flowing into the interior (same role as the heater core in a
conventional system). ...
 Outer Condenser Components and Components Location
Components Location
1. Outer Condenser
...
Other information:
Kia Soul EV (PS EV) 2015-2020 Service Manual: High Voltage Shut-off Procedures
High Voltage Shut-off Procedure Be sure to read and follow the “General Safety Information and Caution” before doing any work related with the high voltage system. Failure to follow the safety instructions may result in serious electrical injuries. ...
Kia Soul EV (PS EV) 2015-2020 Service Manual: Relay Box (Engine Compartment) Repair procedures
Inspection 1. Disconnect the negative (-) battery terminal. 2. Pull out the relay from the engine compartment relay box. Power Relay (Type A) – Do not use pliers. – Pliers will damage the relays, which could cause the engine to stall or n ...
Copyright © www.ksoulev.com 2020-2025


